Celebrating Graduation with Honor: My Card for the Craft Challenge Blog

Handmade graduation card featuring a donkey with a graduation hat, standing in front of a yellow and grey board on the background. The card includes the sentiment 'Trust Yourself School Diploma' on a yellow and grey board.

Welcome to my latest blog post, where I am excited to share the inspiration behind a card I created for the Craft Challenge Blog.

This week our challenge is sponsored by:

The paper shelter:

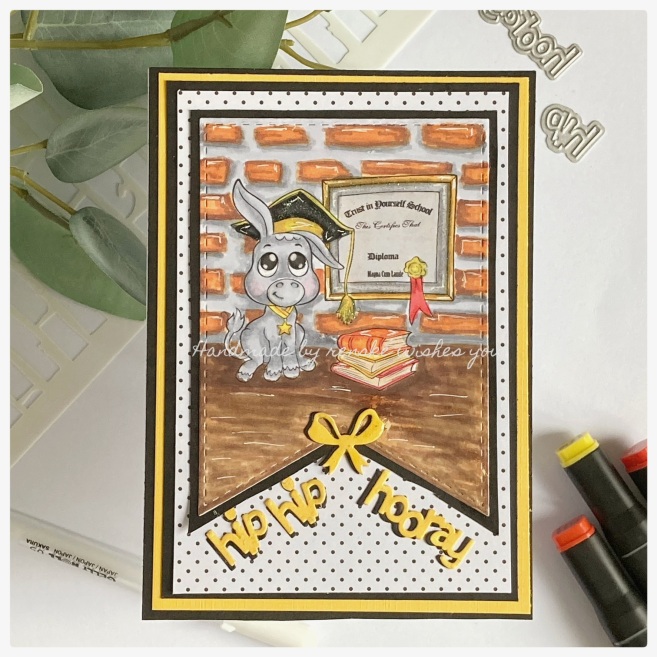
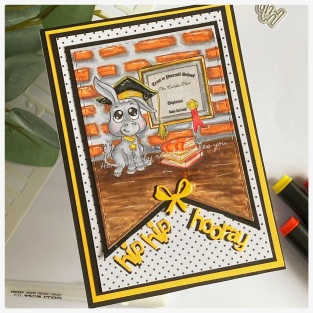
I had the pleasure of using their delightful digital stamp called “Graduated with Great Honor.” Join me as I walk you through the process and details of this special graduation-themed card.

Design details:

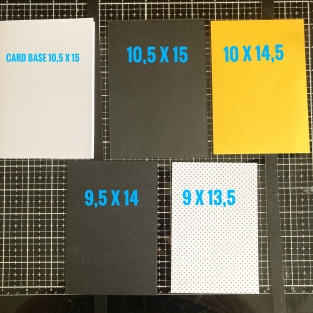
For my card, I wanted to create a visually striking layout, so I carefully chose the measurements for each layer. The base card measures 10.5 centimeters by 15 centimeters, providing a sturdy foundation for the design. The front of the card is covered in black, adding a touch of elegance.

Next, I layered a yellow cardstock measuring 10 centimeters by 14.5 centimeters, followed by a black cardstock measuring 9.5 centimeters by 14 centimeters. These layers create a bold and eye-catching contrast.

To add a playful element, I used patterned paper with black dots measuring 9 centimeters by 13.5 centimeters. This patterned paper complements the overall color scheme and adds a touch of whimsy to the design.


"Image displaying the layered construction of the card. From bottom to top: a white base card measuring 10.5 centimeters by 15 centimeters; a yellow cardstock mat measuring 10 centimeters by 14.5 centimeters; a black cardstock layer measuring 9.5 centimeters by 14 centimeters; and a patterned paper with black dots measuring 9 centimeters by 13.5 centimeters. Each layer adds depth and dimension to the overall design.

The digital stamp and die-cutting

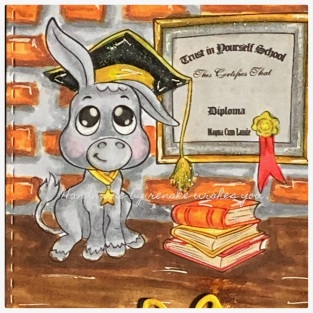
The star of my card is undoubtedly The Paper Shelter’s “Graduated with Great Honor” digital stamp. I printed my digital stamp on white DCP paper. To highlight this cute image, I carefully die-cut it with a banner. This adds a unique shape to the focal point and also enhances the overall design.

Coloring techniques and coloring combinations:

I wanted to bring the scene to life with carefully chosen color combinations. I colored everything with my twin markers (alcohol markers).

The pictures shows my twinmarkers (alcohol markers) I used for the coloring.

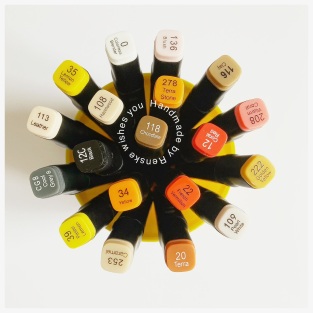
Here is a list of the color combinations I used:

  • Donkey: Cool Grey 5 (CG5), Cool Grey 4 (CG4), and Cool Grey 1 (CG1) and the blush on the cheeks Blush (136).
  • Stones on the background: Burnt Sienna (95), Terra (20), and Terra Stone (278).
  • The floor: Chocolate (118), Clay (116), Burnt Sienna (95), Walnut (100), and Caramel (253).
  • Hat: Black (120), Cool Grey 9 (CG9), Cool Grey 8 (CG8).
  • Plume: Golden Yellow (222), Lemon Yellow (35), and Pastel Lemon (39).
  • Orange Book: French Vermilion (23), Orange (23), and Yellow (34).
  • Yellow Book: Golden yellow (222), and Lemon Yellow (35).
  • Coral Book: Coral Pink (16), Warm Coral (208), and Coral Red (12).

By layering and blending these colors, I achieved a realistic and charming appearance for the donkey. The addition of a yellow star around the donkey’s neck brought a pop of color and added visual interest.

Digital stamp of a donkey with grey fur, wearing a black and yellow graduation hat. A yellow star is around its neck. The stamp is colored with shades of grey and yellow."

Sentiment and Embellishments:

To further enhance the card’s celebratory feel, I die-cut the words “hip hip hooray” from yellow and black card stock. By layering them slightly off-center, I created a subtle black shadow effect, adding depth and dimension to the sentiment. Similarly, I used the same layering technique for the bow die, resulting in a visually appealing and festive embellishment.

Background and Finishing Touches.

To create a special backdrop for the donkey, I used my Twin markers to draw a brick wall behind it. To draw the bricks, I used a stencil as a guide. I carefully drew some pencil lines where the bricks should be. When I did that, I colored the bricks with my alcohol markers.

To add a touch of sparkle and shine, I applied glitter glue to the donkey’s hat and the sentiment board, elevating the celebratory atmosphere of the card. Additionally, I used paper glaze on the donkey’s eyes, nose, and the star around its neck, creating a glossy and dimensional effect that makes these details stand out.

The picture tells the same as the first picture I showed, but this picture is taking in a different angle.

Making this graduation-themed card for the Craft Challenge Blog, sponsored by The Paper Shelter, was great fun to do.

I encourage you to join the Craft Challenge Blog and explore the creative possibilities of The Paper Shelter’s digital stamps. Whether someone is graduating or some other special occasion, don’t forget that handmade cards can give it just a more festive touch.

Happy crafting!

Affiliate products used:

Non affiliate products used:

  • Digital stamp Graduated with Great Honor from The paper shelter.
  • Twinmarkers (alcoholmarkers) from Decotimecrafts.
  • Banner and sentiment dies from Aveccreative.
  • Pattern paper from Craftsensations.
  • Black and yellow card stock brand unknown.
  • Dutch Doobadoo brick stencil.

I would like to enter my card in the following challenges:

Capturing romance: Exporing the beauty of Colour of love’s Poppy Romantique

Hello everyone!

Today I share with you a card I created for the new challenge on the Penny’s Paper-Crafty challenge blog. The theme is like always “Anything goes”.

Our sponsors are:

Colour of love

Prize: 2 digi images of the winners choice.

All Dressed Up stamps

Prize: 2 digi images of the winners choice.

This challenge provided the perfect opportunity to immerse myself in a world of romance and creativity. I got to work with the digital stamp Poppy Romantique from Colour of Love. Join me as I take you through my creative process and share the dreamy and captivating card I crafted.

Inspiration and design

The Poppy Romantique stamp from Colour of Love is a beautiful stamp. It is a large stamp and mostly looks a bit like a colour plate. But there is something magical about this image of a woman in a flowing dress, sitting on a tree stump and holding a delicate parasol. The beautiful moon in the background added an extra touch of magic and romance.

Coloring with twinmarkers

Using my Twin markers (alcohol markers), I brought this enchanting scene to life.

I coloured the moon in warm shades of yellow and gold, creating a soft, radiant glow. On the spots on the moon, I applied white with a white gel pen. I colored the woman’s dress purple shades. To also add some color that stands out, I chose bright pink flowers on her dress, umbrella and around the moon.

Below you can see a list of the color combinations I used.

  • Skin: Peachy Blush (259), Salm Pink (25) and Barely Beige (29).
  • Hair: Caramel (253), Walnut (100), Brown Grey (104) and Clay (116).
  • Dress and diadem: Blue Grey Purple (158), Electric Purple (159) and Mauve shadow (146).
  • Sky: Baby Boy (144), Midi Sky (190), Dark Sky (191) and Cobalt Blue (71).
  • Ground: Dark Brown (119), Chocolate (118) and Clay (116).
  • Tree trunk: Natural Oak (91), Burnt Sienna (95) and Sand (107).
  • Flowers: Peony Purple (282), Rose Pink (08) and Pale Pink (09).
  • Moon: Golden Yellow (222), Lemon Yellow (35), Pastel Yellow (39) and Pale Yellow (38).
  • Moss: Dark Olive (225), Sap Green (235).
  • Leaves: Grass Green (47).
  • Parasol: Cool Grey 4 (CG4), Cool Grey 1 (CG1) and the Colorless blender (0).

Creating a dreamy Background

To create the romantic mood, I focused on creating a dreamy starry sky as a background. Using a combination of blue, purple alcohol markers, I mixed the colours to create a nocturnal atmosphere. I placed the light blue by the moon. You create a glow around the moon. The further you go to the outside, the further you use the dark blue purple colors. I then added twinkling stars with a white gel pen, which increased the enchantment of the card and added a touch of romance.

Finishing touches

To make things even more interesting, I incorporated additional details into the card. I applied paper glaze to the moon and flowers of the stamp, for a glossy and dimensional effect. The white umbrella was left untouched and gave a subtle contrast to the vibrant colors.

Still, to add dimension to the card, I decided to make the certain flowers 3d. To do this, I printed out stamp again, colored the flowers and attached them to the stamp with foam tape.

Finally, I stuck a sentiment sticker with the phrase “Stars make me dream”, capturing the essence of the romantic theme.

Join the Penny’s Paper-Crafty challenge and shine!

As a member of the design team for the Penny’s Paper-Crafty Challenge, I created this card as inspiration for the current challenge. Now I invite all my readers and fellow crafters to join this exciting challenge and unleash your creative talents! The Penny’s Paper-Crafty Challenge Blog is the perfect platform to highlight your skills, receive feedback and connect with a supportive crafting community.

To participate, all you have to do is go to the Penny’s Paper-Crafty Challenge Blog and follow the guidelines for each challenge. The theme is always “anything goes, so you can share anything as long as you use paper. Whether you are a seasoned crafter or just starting out on your creative journey, this challenge is open to all skill levels. Don’t be afraid to take the plunge and share your unique perspective!

I also encourage you to check out the creations of the other talented members of the design team. They make beautiful things and who knows, you might get inspiration from them.

It was incredibly fun to make this romantic card for the Penny’s Paper-Crafty Challenge.

Remember, the Penny’s Paper-Crafty Challenge is not just a contest, but a celebration of creativity and a platform for growth. Embrace the themes of the challenge, push your boundaries, and see where your imagination takes you. I can’t wait to see your amazing entries and encourage you every step of the way.

Products I used:

Affiliate products:

Non affiliate products

  • Digital stamp Poppy Romantique from Colour of love.
  • Twinmarkers (alcohol markers) from Decotimecraft. You can buy this in the Action NL stores. But you can use any color medium you like.
  • Paper Glaze from Aleene’s.
  • Black cardstock
  • White DCP paper to print the image on.
  • White Card stock to make your base card.

I would like to enter my card in the following challenges.

Coloring fun with the “Summer Icecream” digital stamp for a Summary card

Hello everyone!

When I first saw the “Summer Icecream” digital stamp, an image of a summer beach scene immediately popped into my head. I could almost feel the warm sand under my toes, hear the gentle pounding of the waves and taste the refreshing ice cream flavors. Who can resist the combination of ice cream, beach, and sea? With this image in mind, I set out to create a card that captures the wonderful feeling of a perfect beach day.

I am excited to share this creation with you, which serves as an Design Team inspiration card for the new challenge in the All Dressed Up stamps Facebook group. This digital stamp perfectly captures the carefree and cheerful mood of summer and I want to reflect this mood on this card. Join me as I take you through the creative process of bringing this summer beach scene to life, with coloring playing a significant role in combination with the beach dies I used.

Let’s get into it.

The “Summer Icecream” digital stamp

The “Summer Icecream” digital stamp from All Dressed Up stamps is an adorable image of a girl with an ice cream stand. You can use this digital stamp in different scenes. But since here in the Netherlands the summer holidays are about to start, I wanted to make it a beach scene. But you can make any scene you want with it. For example, in a park or in the city, whatever you like.

This cheerful digital stamp invites you to make cards that radiate happiness. What scene do you think of when you see this digital stamp? What thoughts and feelings do you notice when you think of getting an ice cream? Use these thoughts and feelings to make your own scene with this stamp. The details offer plenty of opportunities to color and customize the scene to your taste, so you can make the digital stamp your own.

Coloring with Twinmarkers (alcohol markers)

To give this scene cheerful colors, I used my trusty twin markers. I chose colors that convey the sunny and cheerful atmosphere of a beach day. The girl’s dress, adorned with a sunny yellow bow, exudes warmth and cheerfulness, and fits perfectly with the overall summer mood of the card. I used a combination of pink, blue, yellow, and green to get the cheerful effect. The colors I chose evoke the fine feeling of a bright sunny beach day.

  • Skin: Tanned Skin (260), Peachy Blush (259), Salmon Pink (25), and Barely Beige (29).
  • Hair: Buttercup Yellow (141), Mustart (30), Mellow Gold (219).
  • Dress, Bow, yellow stripe on canopy, and yellow icecream: Dark Yellow (31), Lemon Yellow (35) Primary Yellow (221)
  • Icecream Stall, sea, blue stripe on canopy, bucket and scoop, and blue icecream: Frost Blue (182), Baby Boy (144), And Cerulean Blue (63).
  • Pink stripe Canopy and pink icecream: Pastel Pink (17), Pale pink (08) and Rose Pink (09).
  • Green stripe Canopy: Weeds Green (162), Grass Green (47) and Yellow Green (48).
  • Icecream mint colors: Cool shadow (178), Cool Mint (181), and Aqua Mint (179).
  • Palm tree stam: Clay (116) Walnut (100) and Caramel (253).
  • Leaves palm tree: Forest (50), Grass Green (47) and Weeds Green (162).
  • Beach: Rose Beige (97), Sand (107), Golden Yellow (222) and Light Cantaloupe (275).
  • Sky: Light sky (189), Frost Blue (182) and Baby Boy (144).
  • Shell: Peach candy (277) and Pearl White (109).
  • Sea stars: Neo Pink (212) and Warm Coral (208).

Setting the Scene:

To bring the background to life, I combined the digital stamp “Summer Icecream” with my beach dies. I used die-cuts for the beach, waves and clouds. The image of the girl with her ice cream stand was the perfect centrepiece, while the beach dies added depth and realism to the card. The scene immediately came to life and immediately exuded the summer feeling.

I die-cut the beach, waves out of white card stock. I colored them with my twin markers. You can find the color combination on the list in the section coloring with twin markers.

Adding finishing touches

The beach scene is not complete without a palm tree swaying in the wind. I colored the palm tree with shades of green and brown. To enhance the summer feel, I added a bucket and shovel, as well as two starfish and a shell scattered across the sand. These elements added playful details and reinforced the beach theme of the card. I also incorporated a pair of black flying birds in the sky, giving the scene a sense of movement and freedom.

I die-cut all these elements out of white paper and then colored them in with the twin markers. You can find the combinations of colors in the list I placed in the section coloring with Twin markers.

The sentiment

I was looking for a good sentiment for this summery beach card but couldn’t find a good stamp or digital sentiment for the message I wanted to convey. So, I decided to create my own sentiment in Microsoft Word.

I typed the text “Wishing you a sweet summer filled with joy and icecream”. I printed this on DCP paper.

I die-cut the sentiment with my cloud die. I applied blue ink on the edges of the clouds.
I stick the clouds on top of the card, and it immediately attracts attention and brings the summer feeling.

Finishing Flourishes

Now it is time to add the finishing touches.

First, I apply highlights with my white gel pen. This gives just a little something extra to a element. I applied the highlights to the ice cream stand, bucket and scoop and the two starfish.

I then applied some paper glaze on several parts to give some shine to those parts. I applied this to the ice cream, the strips of the canopy of the ice cream stand and the starfish. I also applied some different layers on the waves. It gives these elements a sheen, as if they are glistening in the sun.

Final thoughts

As I finish the last parts, I feel a sense of satisfaction and accomplishment. The power of creativity is to take us to beautiful places and put us in the mood of happiness and relaxation.

I hope this card and the process of making it has given you inspiration and brought a smile to your face. Whether you make cards, paint, or any other form of creativity, I encourage you to make time for your creativity. It gives so much pleasure.

I invite you to join me on this creative journey and share your own inspired creations. Let’s spread the summer spirit far and wide! If you make a card or any other project inspired by this beach scene, I would love to see it. Tag me on Instagram or on Facebook. In addition, hope to see your creations in the challenge of All Dressed Up stamps Facebook group. To join you must create something with a product of All Dressed Up stamps.

Thanks for joining me on this creative journey. I look forward to seeing your beautiful creations and connecting with you in our online crafting community. Together, let’s continue to celebrate the joy of creativity and spread happiness through our handmade art.

Wishing you endless inspiration and happy crafting days ahead.

Disclosure: Some of the links I mention are affiliate links, which means I may earn a small commission if you make a purchase through those links. However, please rest assured that I only recommend products that I personally use and love. Your support helps me continue creating and sharing inspiration with you. Thank you!

Affiliate productes

Non affiliate products

  • White card stock to die-cut all the elements from for this card.
  • White DCP paper to print you digital image on.
  • Beach scene dies from Aveccreative. You can buy this in the Action NL stores.
  • Twinmarkers (alcohol markers) from Decotimecrafts. You can buy this in the Action NL stores.
  • Paper glaze from Aleene’s
  • Papertrimmer or scissors.
  • Sticky glue.

I would like to enter my card in the following challenges:

Creating a Stunning Easel Card with Dream Catcher Digital Stamp: A Step-by-Step Tutorial”

Hello everyone!

I’m excited to share with you my latest creation as a design team member of the CRAFT Challenge blog. As we kick off a new challenge with the theme of Easel cards. I got to work with the beautiful digital stamp “Dream Cather” from our sponsor All Dressed Up Stamps.

This image shows a peaceful scene—a girl lying in a hammock, accompanied by an adorable kitten, gently swaying on the branch of a cherry blossom tree. As soon as I saw this digital stamp, I knew it would be the perfect picture for an easel card.

In this tutorial, I’ll guide you through the process of creating a stunning easel card featuring the beautiful Dream Catcher digital stamp.

Easel card dimensions

  • Base of the easel card: Cut a 5.5-inch by 11-inch piece of sturdy white cardboard. Score at 5.5 inches and 2 3/4 inches.
  • Easel card pieces: Cut two pieces of sturdy white card stock measuring 5.5 inches by 5.5 inches. Score each piece at 2 3/4 inches and 1 3/8 inches. Fold along the score lines.
  • For the back of the easel card: Cut a 5.25-inch by 5.25-inch piece of blue cardboard. A piece of white cardboard measuring 5 inches by 5 inches.
  • For the stopper of the easel card, you need a piece of card stock measuring 1.5 inches by 5.5 inches.

Step-by-Step Guide: Creating a Dreamy Easel Card

Step 1: Printing and coloring the “Dream Catcher” digital stamp

I printed the image “Dream Catcher” onto a piece of DCP paper. I colored the image with my alcohol markers, as they give a vibrant and blended colors. But you can use any preferred coloring medium.

I used the following colors with my Twinmarkers:

  • Skin: Tanned skin (260), Peachy Blush (259), Salmon Pink (25) and Barely Beige.
  • Hair: Caramel (253), Brown Grey (104), Walnut (100) and Clay (116).
  • Dress, Bow and Flowers: Midi Old Rose (199), Old Rose (201) and Dark Old Rose (202).
  • Hammock: Baby Boy (144), Midi sky (190), Dark Sky (191).
  • Dots on the bow: Blue Grey 1 (BG1).
  • Cat: Caramel (253), Sand (107) and Rose Beige (97).
  • Leaves: Weeds Green (162), Grass Green (47) and Forest Green (50).
  • Cherries: Cherry Pink (05), English Red (249) and Burgundy (247).

Step 2: Creating the Easel card base

Step 2: Creating the Easel Card Base

  • Cut a piece of white paper measuring 5.5 inches by 11 inches. Score it at 5.5 inches and 2 3/4 inches. This will serve as the base of your easel card.
  • Cut two pieces of white paper, each measuring 5.5 inches by 5.5 inches. Score them at 2 3/4 inches and 1 3/8 inches. Fold along the score lines to create two smaller easel elements. These three pieces will form the foundation of your easel card. Arrange them to create the desired easel shape and ensure stability.
  • Take the piece of card stock measuring 1.5 inches by 5.5. inches. This comes of the end of the base of the easel card.
  • Then you have your two square pieces they will stand on the back of your Easel card.

Your easel card should like this now.

Now that we have created the easel card base, we can design the background and dd the fun elements that make our card really special.

Step 3: Designing the background

  • Print an additional copy of the “Dream Catcher” digital stamp on regular printing paper and trim it with scissors.
  • Position the fussy-cut image over the printed image on the background piece and secure it in place with some purple tape or low-tack adhesive.
  • Place a cloud stencil over the background and use blue ink to create fluffy clouds. Apply the ink gently with a blending tool, focusing on the open areas. Start from the top of the card and work your way down, gradually adding more color to create a soft, dreamy sky. You can hold the stencil in different angles to make the background more interesting.
  • Remove the tape and reveal the untouched image of the girl and the cat against the cloudy sky.
  • For the bottom section, use a grass die to create a grass landscape. Cut the grass from white card stock and add color with ink in various shades. Apply metallic paint splatters for a textured effect.

Step 4: Adding dimension and details

  • Cut three pieces of grass using the same technique as before. These grass pieces will be placed on the smaller easel card elements.
  • Adhere the square blue card stock to the base of the easel card. Layer the printed background piece with the girl and the cat on top of the blue card stock.
  • Attach the grass pieces to the two smaller easel elements, adding dimension and a cohesive look to the overall design.
  • I die-cut a fence out of white paper. I adhere this behind my second grass pieces.

Step 5: Bring in the Blooming beauty

  • Use flower-shaped dies or punches to create several flower embellishments from white card stock. Layer different sizes and shapes of flowers to add depth and dimension. But you can also use colored card stock for this.
  • I colored the flowers with my alcohol markers using the same colors as my digital image.
  • Adhere the flowers glue to give them a raised effect. This will add a touch of elegance and make your card come alive.
  • I also placed some cherries on the background piece in the grass. It creates the effect the cherries are falling from the tree.

Step 6: Adding sentiments for a Personalized Touch

  • The first sentiment,” Just Relax, ” comes from the Paper blok “My favorite Crafting Book” from Studiolight. There are several sentiments in that paper block. I thought this one went very well with the image. I place the sentiment on top of the background piece where the girl is relaxing in her hammock.
  • For the second sentiment, I die-cut the Word Smile out of craft paper. This uplifting word will add a touch of joy and positivity to your creation.
  • From the same paper block, find the letters that spell “Enjoy”. Cut out the letters individually and arrange them to form the text “Enjoy”. Stick it on the card and complete the trio of sentiments.

Discover More Inspiration

I hope this step-by-step tutorial has inspired you to make your own easel card with the enchanting “Dream Catcher” digital stamp.

Looking for more card-making ideas and techniques? Discover the creativity of other design team members on the CRAFT Challenge blog.” I hope you will join our challenge and I will see your creation there.

Thank you for joining me on this creative journey. I can’t wait to see the creations you’ll create. Show me on Instagram or Facebook by tagging me.

Happy crafting!

Disclosure: This post contains affiliate links. If you make a purchase through these links, I may earn a small commission at no additional cost to you. By using these affiliate links, you’ll be supporting my blog and helping me bring you more inspiring content. Thank you for your support!

Supply list:

Affiliate products:

Non-affilate products:

  • Bird die from Aveccreative
  • Cloud stencil from Carlijn Design.
  • Grass die from Aveccreative
  • Chalk ink from Decotimecrafts
  • Metallic paint brand unknown
  • Craft paper brand unknown.
  • Die with the word Smiles from Aveccreative.
  • White card stock.
  • Blue card stock.
  • Black card stokc
  • Glue

I would like to enter my card in the following challenges:

Crafting a Stunning Card in a Box with Wellie Boots Stamp.

Hello everyone!

Today I am happy to share with you my Design Team inspiration card featuring the beaufitul “Wellie Boots” image from All Dressed Up Stamps. Wendy released three digital stamps this month.

I got to work with the digital stamp Wellie Boots. When I saw this digital stamp, I imagined her looking satisfied over her field of flowers after her hard work. Join me on this creative journey as we delve into the making of this card in the box and the products that brought it to life.

Designing the card

To create a unique and dimensional card, I decided to create a card in a box. This style adds depth and creates a beautiful visual. I carefully placed “Wellie Boots” so that its look like the girl is standing in the middle of a field of blooming flowers.

Coloring and detailing.

To bring the image to life, I used my alcohol markers (Twinmarkers) to color the “Wellie Boots” stamp.

  • Skin: Barely Beige (29), Salmon Pink (25), Peachy Blush (29) and Tanned Skin (260).
  • Hair: Caramel (253), Brown Grey (104), Walnut (100) and Clay (116).
  • Shirt: Pastel Pink (17), Pale Pink (09) and Rose Pink (08).
  • Trousers: Light Sky (189), Midi Sky (190), Dark Sky (191) and Dark Denim Blue (195).
  • Boots: Primary Yellow (221), Lemon Yellow (35), Yellow (34) and Orange (23).
  • Shovel: Blue Grey 5 (BG5), Blue Grey 3 (BG3) and Blue Grey 1 (BG1).

Building the box (Inspired by Ink something Crafty):

To give my card structure and dimension, I followed the tutorial provided by Ink Something crafty. By following her step-by-step instructions, I successfully made a beautiful box in a card. To view the original tutorial and gain a deeper understanding of the box-building process, please visit her tutorial.

For my card base, I chose heavy weight white card stock, so it would be stable while showing the scene inside.

I used the following materials:

  • Blue cardstock: 4 1/4″ x 3 1/2″ (for the back standing part)
  • White cardstock: 4″ x 3 1/4″ (for the background on the back)
  • Patterned paper: 4 1/4″ x 1″ (for the front, scored 3/8″ from both sides)
  • White cardstock: 2 pieces of 2 3/8″ x 2″ (for the sides of the box)
  • Patterned paper: 1 3/4″ x 1 3/4″ (for layering the sides)
  • White cardstock: 4 1/4″ x 3/4″ (for the center of the box, scored 3/8″ from both sides)

With these materials I followed the instructions of Ink Something crafty and made this beautiful box.

Creating the scenic background

To bring the scene to life, I used my 4″ x 3 1/4″ white card stock as the background and incorporated clouds and grass elements. I also used the pieces for the the layering sides.

  1. Cloudy Sky: Using a cloud stencil, I placed it on the white card stock. Then, with a blending tool, I create clouds all over the background. This technique added depth and a dreamy atmosphere to the scene.
  2. Grass: To give the girl a place to stand, I die-cut a piece of grass using a grass-shaped die. I chose different shades of green to bring different colors to the grass. To give the piece some texture I applied green splatters with my metallic paint. When I was happy with the color, I placed the grass at the bottom of the card stock.

Adding clouds and grass really brought the background to life and created a perfect setting for the girl to enjoy her field of flowers..

Embellishing with pattern paper

To add beauty and dimension to the card, I used patterned paper for the front of the card and incorporated the flowers from the paper as embellishments in the layered parts of the grass.

From the chosen pattern, I carefully cut out the flowers to use as embellishments. From the paper I cut the different sizes of flowers. This way you get diversity and a more dynamic whole.

As a sentiment, I stuck the word Flowers on the front of the card in the box. The hearts in the background next to the girl indicates that she loves this.

Assembling the card

With all the parts ready I glued the “Wellie Boots” image to the back of my card. I stick all my flowers with glue on the grass layers. I placed two butterflies on my background.

I loved making this card in a box featuring the “Wellie Boots” image from All Dressed Up Stamps. I hope this blog post has inspired you to create your own card in a box. The possibility’s are endless.

Thank you for joining me on this creative journey. Stay tuned for more inspiring projects.

Happy Crafting!

“Disclosure: This blog post contains affiliate links. If you click on these links and make a purchase, I may earn a small commission at no additional cost to you. I only recommend products and services that I personally use and believe will be beneficial to my readers. Your support in purchasing through these links helps me to continue creating content. Thank you for your support!”

Supply list:

Affiliate products:

Non affiliate products:

  • Cloud stencil from Carlijn Design.
  • White Card stock
  • Blue Card stock
  • Patterned paper from the Writing block by Decotimecrafts.
  • Grass die from Aveccreative.
  • Green chalk ink from Decotimecrafts. I used the colors Bottle Green and The Hulk.
  • Sticky glue from Action NL.

I would like to enter my card in the following challenges:

Thank you centre stepper card | Polkadoodles

Hello everyone!

Today it’s time for another challenge on the Polkadoodles challenge blog. We, as the design team have been asked to create a “Thank you” card. For this card, I combined two digital stamps. I used Honeypie Sweet Flower Bouget and parts of the digital stamp Surprise Gifts. I noticed that the Surprise gifts digital stamp has the same flowers as Honeypie’s bouquet, so I wanted to use only the flowers from the stamp Surprise Gifts. In this article I tell you how and in what way I made this centre stepper card.

I will link all the Polkadoodles products I used below.

Let’s get into it.

Making the base of the centre stepper card.

Above you can see the stepper card template. The red lines are the score lines and the blue lines are the cut lines.

  1. As you can see from the template, you will need a one piece of paper measuring 8.5 inches by 5.5 inches. Mark on the short side with your pencil at 1 inch. Now mark on both long sides at 1 inch, 2, inches, 4.25 inches and 5.25 inches. The blue line you cut. So, the blue line between 1 inch and 5.25 inches. You do this on both sides. The red lines are the score lines.
  2. Mountain fold the 1st Score line, valley fold the second and mountain fold the last score lines.
  3. Cut the brown papers. Cut 5.25 inches by 0.75-inch piece. 2 pieces of 3 inches by 1 inch. And one piece 2.75 inch by 3 3/16 inches.
  4. Cut the pieces of pattern paper. 2 pieces of 2.75 inches by 0.75 inch. And 1 piece 2.75 inches by 3 inches.
  5. Cut one strip of white card stock measuring 5 1/8 inch by 5/8 inch.

Glue this on you base card, and your base card will look like this.

Coloring the digital stamps

  • Skin: Peachy blush, Salmon Pink and Barely Beige.
  • Hat, jacket socks, and leaves: Yellow Green, Pale Green, Spectrum Green, Forest Green.
  • Bow, Flowers and shoes: Bright Apricot, Warm Coral, Cherry Pink and Rose Red.
  • Hair: Caramel, Brown Grey, Walnut, Clay.

Using parts of a digital stamp

I used two digital stamps from Polkadoodles.

The first digital stamp is Honeypie Sweet Flower Bouquet. I used this stamp in its entirety. The second stamp is Surprise Gifts. From this stamp, I only used the flowers. You can crop the image in Word for example or you can print the whole image and cut off the flowers. This time, I printed the whole stamp and later cut the flowers off. I did this because I wasn’t quite sure which parts of the flowers to use.

Sentiment

I printed the sentiment on white DCP paper. And then trimmed it to the piece a needed for the front of the centre stepper card.

Now it’s time to assemble this card. I place all the pieces where I wanted them to go. The card is now finished.

Thank you so much for visiting my blog. I hope you like the card. Let me know in the comments.

Happy Crafting!

I would like to enter this card in the following challenges:

Polkadoodles products used:

Other products used:

  • Green card stock.
  • Brown card Stock
  • White gelpen

Christmas Snowman with bird card

Make your own glitter paper.

Hello everyone!

You’ve had to miss some inspiration from me for the Craft challenge blog. I took a temporary break due to personal circumstances, but it all seems to be calmer now. Today starts a new challenge and the theme is Christmas this week. I had some trouble getting into the Christmas mood as it is quite hot here in the Netherlands. But the thought of snow did cool me down.

Our sponsors is:

I got to work on this cute snowman and bird.

Let’s get into it.

Card recipe:

  • Base card measuring 10,5 centimeters by 15 centimeters. You will need a piece of card stock measuring 21 centimeters by 15 centimeters. Score at 10,5 centimeters.
  • A piece of white card stock to make your background on.
  • Rectangle die to die-cut the frame out of white card stock.
  • Background die.
  • Branch dies.
  • Ink
  • Twinmarkers (alcohol markers).
  • Glitter glue.
  • Glitter.

Coloring the digital stamp

I printed my digital stamp on DCP paper and colored it with my alcohol markers.

  • Hat of the snowman: Black (120), Cool Grey 9 (CG9), Cool Grey 8 (CG8) , Cool Grey 5 (CG5).
  • Band around the hat: Light Sky (189), Midi Sky (190) and Dark Sky (191).
  • Snowman: Cool Grey 4 (CG4), Cool Grey 1 (CG1) and Colorless Blender (0).
  • Broom: Dark Wood (119), Chocolat (118), Clay (116), Natural Oak (91), Burnt Wood (95).
  • Hat of the bird: Blue Grey purple (158), Electric purple (159) and Ultra Marine (73).
  • Bird: Blue Grey 1 (BG1), Blue Grey 3 (BG3).
  • Belly of the bird: Caramel (253).
  • Beak and legs: Orange (23).

Background

First, I apply the ink on the background. At the top of my background, I use the color purple and at the bottom, blue.

I used the following colors:

  • Sweet silk (30).
  • I love purple (15).
  • Blue Berry (78).

On this panel, I used a background die to make it look like it’s snowing. I also made a snow hill on which the snowman and the bird are standing. I die-cut it out of white card stock. On top of this snow mound, I apply some purple ink and glitter glue.

Creating your own glitter frame.

I used two rectangular dies to die-cut a frame out of white cardboard. I want there to be glitter on the frame. On the frame I apply some glitter glue and on top of that I apply extra glitter to give it extra shine. I really like the result.

Assembling the card.

Now it’s time to assemble the card. First, I die-cut some branches out of brown paper and inked them with brown ink. I stick this branches on my background. On top of the branches, I stick my sentiment.

I stick my snow mound on the bottom of my background and stick my snowman and bird on top.

I stick the frame with foam tape on top of my background and stick this on top of my base card.

Thank you for visiting my blog. I hope you enjoy this post and get inspiration from it. Check out the creations of my other team members on the C.R.A.F.T. challenge blog. I hope to see you there.

Happy crafting!

I would like to enter my card in the following challenges:

Products I used:

  • Digital stamp from D.R.S. designs.
  • Chalk ink from Decotimecrafts.
  • Twinmarkers (alcohol markers) from Decotimecrafts.
  • Branch dies from Aveccreative.
  • Glitter glue from Craftsensations.
  • Glitter brand unknown.

Happy Birthday cake and balloons slimline card

Use your stencil for dry embossing

Hello everyone!

It’s time again for a new challenge on the Penny’s Paper-Crafty challenge blog. The theme is always anything goes.

Our Sponsors are:

and

For this challenge, I got to work with the digital stamp Happy birthday slice by Mirtillamente.

Who wouldn’t want cake and balloons for his/her birthday? For this card, I wanted to use bright colors to make it nice and festive. In addition, I again used the dry embossing technique with your stencil.

So, lets get into it.

Card recipe:

  • The base of the card is the size of a slimline card. You will need a piece of white card stock measuring 21 centimeters by 21 centimeters. Score at 10,5 centimeters.
  • A piece of white card stock to use your dry embossing with stencils on.
  • Digital stamp.
  • Letter dies.
  • Stencil.
  • Alcohol markers. But you can use any color medium you like.
  • Punch.
  • Colored card stock.
  • Black card stock measuring 21 centimeters by 10,5 centimeters. And scraps. Fi
  • Slimline die.
  • Die-cutting machine.

Coloring of the digital stamp.

I printed my digital stamp on DCP paper.

As you can see, I did not use the digital stamp as you buy it. I decided to separate the pastry and balloons. This time, I did so by simply cutting them apart after I printed them.

I colored the image with my alcohol markers (Twin markers):

  • Red Balloon: Cardinal (244), English Red (249) and Burgundy (247).
  • Orange Balloon: Cardinal (244), Amber (266), Carrot Orange (269) and Orange (23).
  • Yellow Balloon: Orange (23), Deep Yellow (32), Lemon Yellow (35) and Pastel Lemon (39).
  • Green Balloon: Weeds Green (162), Grass Green (47) and Forest Green (50).
  • Blue Balloon: Dark Sky (191), Midi Sky (190) and Light Sky (189).
  • Flame: Cardinal (244), Orange (23), Deep Yellow (32) and Lemon Yellow (39).
  • Candle: Cool Grey 4 (CG4) and Cool Grey 1 (CG1).
  • Frosting and strawberry: Cardinal (244), English Red (249) and Burgundy (247).
  • Cake: Buttercup Yellow (141), Caramel (253) and Walnut (100).
  • Grapes and berries: Blue Grey Purple (158), Electric Purple (159) and Violet Dark (274).

The colored the balloons twice.

On top of the balloons and the frosting, I applied Paper Glaze to give it some shine.

Dry embossing with a stencil.

I wanted dots in the background of the card. I don’t have these as an embossing folder, but I do have a stencil with dots. So, I decided to apply the technique of dry embossing with a stencil.

To use this technique, you do need a die-cutting machine. Take the bottom plate of the die-cutting machine. This is where you place your embossing mat on top. Spray your paper with water on both sides. Place the wet paper on top of your embossing mat. Place another sheet of paper on top and close with your transparent plate. Run this through your die-cutting machine.

Now you have these beautiful dots on your paper. I die-cut a slice of that with a slimline die.

Creating the sentiment.

On this card, I wanted to use rainbow colors. So, I decided to die-cut the letters for the text Happy birthday in rainbow colors too.

I pasted the letters on black paper. I cut this out along the letters so that I would be left with a border of black as a shadow.

Assembling the card.

First, I glue the black slimline piece on top of my base card. I put all the elements on my card and glued that down. I punch some stars in the same rainbow colors and glue them on my card.

I glue my panel on top of the black card stock and the card is finished.

Thank you so much for visiting my blog. Check out my other team members creations on the Penny’s Paper-Crafty challenge blog. I hope to see you there with your creations.

Happy Crafting!

I would like to enter this card in the following challenges:

Products I used:

  • Slimline die from Aveccreative.
  • Letter dies from Aveccreative.
  • Stencil from Craftsensations.
  • Digital stamp Happy birthday slice by Mirtillamente.
  • Punch brand unkown.
  • Twin markers (alcohol markers) by Decotimecrafts.

Bird and Flowers card | Polkadoodles

Hello everyone!

It’s time again for a new challenge on the Polkadoodles challenge blog. This time, we as a design team were asked to create something with the theme “Birds and Flowers”. I chose the digital stamp “Love bird Rose Flowers.

This stamp, sentiment and digital paper are from the Valentine’s set. But you can also use it for other occasions. I would sent this card to someone who could use some love, and not just for valentine.

Let’s get started.

Measurements:

  • The base card measures 10,5 centimeters by 15 centimeters. To make the base yourself, you will need a piece of white card stock measuring 15 centimeters by 21 centimeters. Score at the long side at 10,5 centimeters.
  • A piece of black card stock measuring 10 centimeters by 14,5 centimeters.
  • A piece of patterned paper measuring 9,5 centimeters by 14 centimeters.
  • A piece of black card stock measuring 8,5 centimeters by 12 centimeters.
  • A piece of white card stock to die-cut a triangle frame from.

Below is a list of all the things I used from Polkadoodles with the links.

Digital stamp and coloring.

I printed my digital stamp on DCP paper and colored it with my alcohol markers.

  • Bird: Cool Grey 4, Cool Grey 1 and the Colerless blender.
  • Beak and legs: Yellow, Dark Yellow and Lemon Yellow.
  • Leaves: Forest Green, Grass Green and Weeds Green.
  • Flowers: Coral Pink, Warm Coral and Cardinal.
  • Hearts: Coral Pink, Cardinal, English Red and Burgundy.

To add some dimension to the image, I created some highlights with my white gel pen. Finally, I put some glitter glue on the heart to give it some shine.

Sentiment

First, I print my sentiment on DCP Paper. I want a banner around it, so I decided to draw the banner around the printed sentiment. I colored it with my alcohol markers using the same colors I used for the hearts. Finally, I put some glitter glue on top of the middle part of the banner to give it some shine.

Assembling the card.

First, I made the frame. I die-cut this with a rectangle die. Behind the frame, I put a piece of white card stock. I wanted some red ink around the bird, so I applied that to the card stock. I glue the frame to the background piece. I glue this to the 8,5 centimeteres by 12 centimeters piece of black card stock.

I put my banner to the bottom of my frame. I want my bird to be on the frame, so I glued him on top of that. I cut a X and a O from the patterned paper and glued that around the bird.

And the card is finished.

Hope you like it. Don’t forget to check out the Polkadoodles Challenge blog to check the creations of the other design team members. And while you’re there, join the challenge. To participate, you don’t have to use Polkadoodles products, and you’ll have a chance to win their products. Hope to see you there.

Happy Crafting!

I would like to enter my card in the following challenges:

I’m listing the products I used below. I will link them when I can. Click on the link to go directly to the product. Where available I use compensated affiliate links which means if you make a purchase, I receive a small commission at no extra cost to you. Thank you so much for your support.

Polkadoodles Products used:

Other products used:

  • Alcohol markers.
  • Glitter glue
  • Glue
  • White gelpen
  • Rectangle die.
  • Red ink.

Twilight garden | Ching-Chou Kuik

How to color this digital stamp.

Hello everyone!

Another new challenge started on the Penny’s Paper-Crafty challenge blog.

Our sponsors are:

and:

I got to work with a digital stamp Twilight Garden by Ching-Chou Kuik. I used the digital stamp as a card-filling stamp, so for this card, I did a lot of coloring. I used my Twin markers for that.

Let’s get into it.

Measurements and things you need.

  • The base of the card is measuring 10,5 centimeters by 15 centimeters.
  • Digital stamp. I made the size of this digital stamp around 10 centimeters by 14 centimeters.
  • DCP paper to print the image on.
  • Blue ink for the background.
  • Metallic paint
  • Alcohol markers.
  • Foam tape.
  • Glue.
  • Black cardstock.
  • White ink.
  • Clear stamp sentiment.
  • Clear embossing.
  • Heat gun.

* When possible I will link the products below.

Digital stamp and coloring.

I print my digital stamp on DCP paper and colored it with my alcohol markers.

  • Skin: Barely Beige (29), Salmon Pink (25) and Peachy Blush (257).
  • Hair: Caramel (253), Brown Grey (104), Clay (116) and Chocolate (118).
  • Yellow Flowers: Canarian Yellow (45), Primary Yellow (221), Sand (107) and Red Barn (245).
  • Roses: Rose Red (03), Cherry Pink (05), Warm Coral (208) and Bright Apricot (214).
  • Purple flowers: Violet Dark (274), Violet (281) and Deep Violet (81).
  • Blue Leaves: Light Denim Blue (193), Dark Sky (191) and Dark Denim Blue (195).
  • Light green leaves: Yellow Green (48), Grass Green (47) and Forest Green (50).
  • Dark Green leaves: Grass Green (47), Forest Green (50) and Dark Green (51).
  • Butterflies: Primary Yellow (221), Deep Yellow (32), Amber (266) and Tiger lily (221).

After finishing coloring I fussy cut the image.

Background.

I want the image to be in the center of the card. I decided to keep the rest of the card simple. On my base card, I applied blue ink and splattered some metallic paint on top.

Sentiment.

I heat embossed my sentiment on black card stock. First, I stamped the word congratulations with white ink on my black card stock. I added my clear embossing powder on top of that and heat set that. I cut around the word and stick this on top of my image.

Now it’s time to put the image on my base card. I want to get some of dimension, so I decide to put foam tape behind the image and stick that on top of my base card.

The card is finished. I hope you like it.

Check out the Penny’s Paper-Crafty challenge blog to see what the other Design Team Members have made. I hope you participate too and see your creations there.

Happy crafting!

I would like to enter my card in following challenges:

I’m listing the products I used below. I will link them when I can. Click on the link to go directly to the product. Where available I use compensated affiliate links which means if you make a purchase, I receive a small commission at no extra cost to you. Thank you so much for your support.

Products used: